The lights flicker, then plunge your home into darkness. A moment later, you hear the familiar rumble of your generator, and click!—power is restored, seamless and swift. This magic, this instant restoration, is thanks to your transfer switch, the unsung hero of your home's backup power system. But like any vital component, a transfer switch isn't a "set it and forget it" device. Understanding how to operate and maintain your transfer switch is crucial for ensuring it performs flawlessly when you need it most, safeguarding your family, your appliances, and your peace of mind.
Think of your transfer switch as a traffic cop for electricity, safely directing power between the utility grid and your backup generator. Without proper care, this critical intersection can become a hazard, leading to unexpected outages, costly repairs, or even dangerous electrical faults. Let's ensure your power remains reliable, your home safe, and your switch ready for action.
At a Glance: Key Takeaways for Your Transfer Switch
- Two Main Types: Manual switches require human intervention; automatic switches detect outages and transfer power on their own.
- Why Maintenance Matters: Prevents power loss, extends lifespan, saves money, and keeps warranties valid.
- DIY Routine is Key: Weekly visual checks, monthly generator/switch testing under load (30 mins), and bi-annual general inspections are essential.
- Safety First: Always power off, use proper gear, and verify with a voltage tester before any work.
- Professional Help: Schedule annual inspections and rely on experts for complex repairs or replacements.
- Listen to Your Switch: Unusual noises, delays, or burning smells are urgent calls for attention.
The Heartbeat of Backup Power: What Your Transfer Switch Does
At its core, a transfer switch is an electrical device that shifts your home's power source between two points: typically, the utility grid and a backup generator. Its primary functions are twofold: to maintain power reliability by smoothly transitioning to your generator during an outage, and to ensure safety by preventing your generator's power from backfeeding into the utility lines—a dangerous scenario for utility workers and potentially damaging to your equipment. It also provides a layer of protection against power surges, much like a guardian for your sensitive electronics.
Properly operating and maintaining your transfer switch isn't just about convenience; it's about extending its lifespan, avoiding costly emergency repairs, upholding your system's warranty, and most importantly, ensuring you have safe, reliable power when the grid goes dark. Neglecting it can turn a minor outage into a major headache, or worse, a hazard.
Manual vs. Automatic: Understanding Your Switch Type
Not all transfer switches are created equal. Knowing which type you have dictates your operational and maintenance approach.
Manual Transfer Switches: Your Hands-On Approach
Manual transfer switches are simpler, more cost-effective options that require you to physically switch power sources when an outage occurs. When the power goes out, you start your generator, then head to the transfer switch and manually flip a lever or switch to connect your home to the generator's power.
Operation:
- Utility Outage: Recognize the power loss.
- Start Generator: Manually start your backup generator.
- Transfer Power: Go to the transfer switch and move the switch from "Utility" (or "Normal") to "Generator" (or "Emergency").
- Restore Utility: Once grid power returns, reverse the process: switch back to "Utility," then shut down your generator.
Maintenance Focus for Manual Switches:
These switches benefit from basic, consistent care. Keep the exterior clean and dry. The mechanical parts should be free of obstruction and able to move smoothly. Regular testing by actually switching power sources is crucial to ensure the mechanism doesn't seize up.
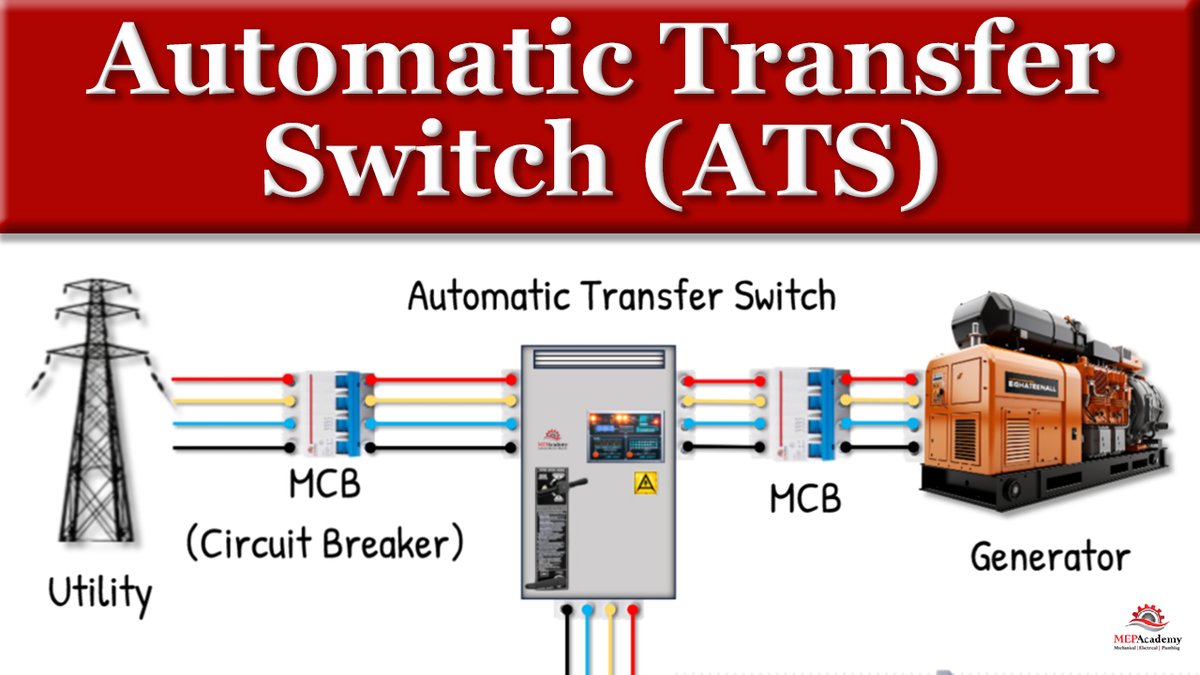
Automatic Transfer Switches (ATS): The Brains of the Operation
Automatic transfer switches, or ATS, are the more sophisticated choice, often paired with whole-home standby generators. They constantly monitor the utility power, sensing when it drops below acceptable levels. Upon detection, the ATS automatically disconnects from the utility, signals your generator to start, and once the generator is up to speed, transfers your home's electrical load to the backup source—all without you lifting a finger. When utility power is restored, the ATS automatically switches back, allows the generator to cool down, and then shuts it off.
Operation:
- Utility Outage: ATS senses power loss.
- Generator Start: ATS signals generator to start.
- Transfer Power: Once generator is stable, ATS automatically transfers load to generator.
- Restore Utility: ATS senses utility power returns, transfers load back to utility, and signals generator to cool down and shut off.
Maintenance Focus for Automatic Switches:
Because of their complexity and constant monitoring, ATS units require more frequent and detailed checks. This includes inspecting wiring and connections for tightness, keeping the internal components free from dust and moisture, and regular testing that simulates power failures to ensure the entire automated sequence (sensing, starting, transferring, returning) works perfectly.
Your Essential Maintenance Playbook: DIY & Professional Steps
Regular maintenance isn't a chore; it's an investment in your home's power security. Here's how to tackle it, from your weekly glances to annual professional deep dives.
I. Routine Inspections: Your Eyes and Ears on the System (DIY - Weekly/Monthly/Bi-Annual)
Consistent visual checks can catch minor issues before they escalate.
- Weekly Quick Look:
- Visual Scan: Briefly open the switch box (if safe and accessible) and visually inspect the internal components. Look for anything out of place—discoloration, loose wires, foreign objects, or signs of pest activity.
- Cleanliness: Noticeable dust or debris buildup? Use a vacuum cleaner (with a non-conductive hose) or a microfiber cloth to gently remove it. Never use water or harsh chemicals.
- Monthly Performance Test:
- Generator & Switch Under Load: The National Fire Protection Association (NFPA) recommends that diesel generators be tested at a minimum of 30% load for at least 30 minutes monthly. This practice should extend to testing your transfer switch under load as well, using normal household appliances. This isn't just about starting the generator; it's about confirming the transfer switch can handle the actual power demand and sustain it.
- Interior Inspection: With power off (if applicable and safe), thoroughly inspect the interior of the switch box for cleanliness.
- Listen & Look: Listen for any unusual sounds (humming, buzzing, grinding) that weren't there before. Check that all terminals and connectors retain their normal color—discoloration can indicate overheating.
- Wiring & Insulation: Examine the condition of all wiring and insulation. Look for fraying, cracks, or signs of rodent damage.
- Covers & Fasteners: Ensure all internal and external covers are securely fastened.
- Post-Test Reset: After all checks and testing, set both your transfer switch and generator back to "Auto" mode so they're ready for an actual outage.
- Bi-Annual General Inspections (At Least Twice a Year):
- Visible Damage: Look for any physical damage like cracks, rust, dents, or loose parts on the exterior of the switch.
- Mechanical Movement: For manual switches, test the mechanical lever or switch. It should operate smoothly without sticking or excessive force. For automatic switches, this is harder to test manually but can be observed during a simulated outage.
- Electrical Connections: Visually check for any loose wires or screws, especially where wires connect to terminals. Only tighten if power is confirmed OFF.
- Corrosion/Burn Marks: Look for any burn marks or corrosion on the terminals or internal components. These are critical warning signs.
- Voltage Verification (Advanced DIY): If you're comfortable and trained with a multimeter, you can use a voltage tester to verify correct power flow when the unit is energized and only on the external accessible terminals, but this is generally best left to professionals.
II. Cleaning and Lubrication: Keeping Things Smooth (DIY - During Routine Inspection)
A clean switch is a happy switch.
- Crucial First Step: ALWAYS turn off the main power source to the transfer switch and generator before beginning any cleaning or lubrication. Use a voltage tester to confirm no electricity is present.
- Dust & Dirt Removal: Use a soft, dry brush or a clean microfiber cloth to gently wipe away dust, dirt, and cobwebs from all accessible surfaces. For tighter spots, use a soft-bristled artist's brush.
- Avoid Liquids: Never use water or any harsh chemical cleaners inside the switch, as these can cause severe damage or electrical hazards.
- Lubrication (Manual Switches): For manual transfer switches with moving parts, apply a very small amount of light machine oil or a manufacturer-recommended electrical lubricant to pivot points or sliding mechanisms. Do not over-lubricate; a little goes a long way. Wipe away any excess.
- Rust & Corrosion: If you notice light rust or corrosion, gently clean it with a fine wire brush (brass or stainless steel) or very fine sandpaper, then wipe clean with a dry cloth before applying lubricant. If corrosion is extensive, it's time to call a professional.
III. Testing Functionality: Proving it Works (DIY - Monthly/Regularly)
The true test of a transfer switch is its ability to perform under pressure.
- Simulated Power Outage Test:
- This is the most critical DIY test. With your generator in "Auto" mode (for ATS) or ready to start (for manual), turn off the main power breaker to your house from the utility grid. This mimics a real power outage.
- Manual Switches: Start your generator, then manually transfer the switch.
- Automatic Switches: The ATS should sense the power loss, signal the generator to start, and then transfer your home's power to the generator—all automatically.
- Observe: Watch for any delays, unusual noises, or outright failures in the transfer process. Note how long it takes for the generator to start and for the power to switch.
- Restore: Once the test is complete, restore utility power, and for manual switches, return the transfer switch to utility power and shut down the generator. For ATS, it should automatically revert and shut down the generator after its cool-down cycle.
- Load Testing:
- While your home is running on generator power during your simulated outage, connect normal appliances and devices.
- Monitor Performance: Observe if the transfer switch (and generator) maintains steady power. Look for flickering lights, dimming, or any strange noises from the switch or generator. Overheating during this period is a red flag.
- Safety First: Always perform these tests in a safe environment, ensuring adequate ventilation for your generator and adherence to all manufacturer guidelines.
IV. Safety Precautions: Non-Negotiables
Working with electricity demands respect and adherence to strict safety protocols.
- De-Energize First: ALWAYS turn off power to both the utility grid and your generator at their main breakers before attempting any inspection, cleaning, or maintenance work on the transfer switch. Use a non-contact voltage tester or a multimeter to confirm that no electricity is present on any component you intend to touch.
- Protective Gear: Wear insulated electrical gloves and safety glasses. Avoid loose clothing, jewelry, or anything that could get caught in moving parts or conduct electricity.
- Manufacturer Instructions: Always refer to and follow your transfer switch manufacturer's specific instructions and safety guidelines.
- Proper Tools: Use tools designed and insulated for electrical work.
- Dry Environment: Only work on the transfer switch in a dry area. Avoid damp basements or outdoors during rain.
- Fire Extinguisher: Keep a Class C fire extinguisher (suitable for electrical fires) nearby.
- No Bare Hands: Never touch metal electrical parts with bare hands, even if you believe the power is off.
- Labeling Wires: If you ever need to disconnect wires, meticulously label them first to ensure correct re-connection.
- Buddy System: When performing maintenance, especially on larger systems, it's always wise to have a second person nearby who is aware of your work and can assist in an emergency.
V. Professional Inspections: The Annual Deep Dive
While DIY maintenance is vital, there are certain inspections and services that absolutely require a qualified, licensed technician.
- Frequency: Schedule a professional inspection at least once a year, or immediately after a major electrical event, lightning strike, or severe storm.
- What a Professional Does:
- Infrared Scans/Thermal Imaging: While the switch is operating, a technician can use thermal imaging to detect "hot spots" that indicate loose connections, overloaded circuits, or failing components long before they become visible.
- De-energized Equipment Inspection: With the system completely shut down and locked out, they'll meticulously inspect for physical hazards.
- Contact Inspection: Arc chutes and pole covers are removed to visually inspect main and arcing contacts for pitting, corrosion, or excessive wear.
- Calibration & Testing: AC trip sensing and time delay functions are tested and recalibrated to verify settings and ensure the switch operates within specified parameters.
- Thorough Cleaning: Beyond simple dusting, professionals use specialized vacuums and soft cloths. They will never use compressed air inside a transfer switch, as it can push conductive dust into critical areas. If moisture or corrosion is present, they'll use manufacturer-approved safe solvents.
- Insulation Check: All insulation is thoroughly inspected for cracks, discoloration, or signs of breakdown.
- Contact Condition: Main and arcing contacts are checked for excessive corrosion or pitting and replaced if necessary.
- Manual Operation Check: The technician will manually operate the main switch mechanism (if applicable) to ensure proper movement, contact alignment, gap, wiping action, and deflection.
- Cable & Connection Tightness: All cables and connections are checked for proper torque and tightened as needed. Loose connections are a leading cause of failure and fire.
- Automatic Transfer Tests: They'll perform comprehensive automatic transfer tests, simulating various conditions like loss of normal power, loss of emergency power, and even single-phase failures to ensure the switch responds correctly to every scenario.
- Reset & Report: After testing, the switchgear is reset to auto mode, and you receive a detailed report of findings and any recommended repairs.
- Part Replacement: Worn or malfunctioning parts, especially critical electrical components, should always be replaced by a qualified technician using manufacturer-approved parts.
If you're considering setting up a backup power system for the first time, or looking to ensure your portable generator integrates safely, understanding various options like a guide to portable generator switches can be incredibly helpful for making informed decisions.
Common Issues and Troubleshooting Your Transfer Switch
Even with the best maintenance, problems can arise. Knowing what to look for can help you decide whether it's a DIY fix or time to call in the pros.
Signs of Trouble: When to Pay Attention
Your transfer switch often provides subtle clues before a major breakdown.
- Unusual Noises: Any new humming, buzzing, grinding, or clicking sounds during operation or standby are red flags.
- Delay in Switching: If your automatic transfer switch takes longer than usual to transfer power, or if a manual switch feels sticky.
- Failure to Transfer Power: The most obvious sign. If the switch doesn't transfer to the generator during an outage (or vice-versa).
- Flickering Lights: This can indicate unstable power delivery.
- Burning Smells or Scorch Marks: These are urgent signs of overheating or electrical arcing and require immediate professional attention.
- Discolored or Melted Components: Any sign of heat damage inside the switch box is a critical safety hazard.
Troubleshooting Basics: What You Can Check (Safely)
- Electrical Faults:
- Loose Wires: (After ensuring power is OFF!) Loose connections are a very common culprit. Gently try to wiggle wires at terminals. If they move, they need to be tightened by a qualified technician.
- Blown Fuses/Tripped Breakers: Some transfer switches have internal control fuses. Check if these are blown. Similarly, check the main breaker to your generator or utility panel. Resetting a tripped breaker might restore power, but if it trips repeatedly, there's a deeper issue.
- Faulty Wiring/Circuits: Beyond visual inspection and fuse checks, diagnosing faulty wiring or internal circuit board problems requires a multimeter and advanced electrical knowledge. For these, professional repair is almost always needed.
- Mechanical Problems:
- Stuck or Jammed Parts: For manual switches, the lever might be stiff or jammed due to dirt, rust, or worn components. Cleaning and gentle lubrication might resolve this (after power is OFF!). If parts appear bent, broken, or excessively worn, they'll need replacement.
- Automatic Switch Mechanism: If an ATS isn't transferring, the mechanical contactors might be sticking. This is usually due to dust, corrosion, or wear. Cleaning might help, but often replacement of contactors by a professional is necessary.
Remember, if you're unsure about any troubleshooting step or suspect a significant electrical fault, do not attempt to fix it yourself. The risks of electrocution or further damage are too high.
Upgrading and Replacing Your Transfer Switch
Over time, or as your power needs change, you might need to upgrade or replace your transfer switch. Perhaps you've installed a larger generator, or your old manual switch no longer meets your convenience demands.
- Matching Power Needs: The most critical step is ensuring the new switch is rated correctly for your electrical system's amperage and voltage, and compatible with your generator's output. Never install a switch with a lower amperage rating than your main electrical panel.
- Professional Installation: While removing an old switch might seem straightforward, the installation of a new one involves complex electrical connections that are best handled by a licensed electrician. They will ensure all local electrical codes are met.
- General Steps (Professional Role):
- Turn Off Main Power: The electrician will kill power from both the utility and the generator.
- Remove Old Switch: The old switch is carefully disconnected and removed, noting all wiring connections.
- Install New Switch: The new switch is mounted, and wires are connected precisely according to the manufacturer's diagrams. All connections are secured and torqued to specification.
- Test Thoroughly: After installation, the electrician will perform comprehensive tests to ensure the new switch functions correctly under various conditions.
Your Maintenance Checklist: Who Does What, When?
To keep your transfer switch in peak condition, here's a quick summary of responsibilities and frequencies:
| Frequency | Responsibility | Task |
|---|---|---|
| Weekly | DIY | Visual inspection for cleanliness, overall condition; remove dust/debris. |
| Monthly | DIY | Generator & transfer switch testing under load (min. 30 mins, 30% load for diesel); interior inspection for cleanliness/debris; listen for sounds; check terminals/wiring; ensure covers secure; reset to auto mode. |
| At least Twice a Year | DIY | General routine inspections: Check for visible damage (cracks, rust, loose parts); test mechanical movement; inspect electrical connections; look for burn marks/corrosion. |
| Annually (or after storms) | Professional | Comprehensive inspection by licensed electrician/technician: Infrared scans, de-energized inspection of contacts/components, calibration tests, thorough cleaning, insulation checks, cable/connection tightening, advanced automatic transfer tests, part replacement as needed. |
| As Needed | Professional | Electrical testing, complex repairs, upgrades, and replacement of the transfer switch. |
Powering Forward with Confidence
Operating and maintaining your transfer switch doesn't have to be daunting. By understanding its role, performing routine DIY checks, and knowing when to call in the professionals, you ensure your home's backup power system is always ready. This diligent approach not only extends the life of your equipment but, more importantly, guarantees that when the grid falters, your lights stay on, your fridge stays cold, and your family remains safe and comfortable. Invest the time in care now, and enjoy uninterrupted peace of mind later.